Exploring the world of coloring has never been more enjoyable, especially when you integrate the fabulous Prismacolor Colorless Blender Pencils into your creations. These versatile tools empower your artistic vision, allowing for seamless blending and layering of colors. Whether you’re an experienced artist or just beginning your coloring journey, this guide will dive into how to optimize your color palette and enhance your artwork with these fantastic pencils.
As you gain insight into the various techniques that take advantage of the unique properties of the colorless blender, you'll find yourself unlocking new dimensions in your creative expressions. The smooth application and refined finish of these Prismacolor pencils will transform your artwork, making it not just vivid, but extraordinary. Let your imagination soar as you learn how to make the most of your color palette!

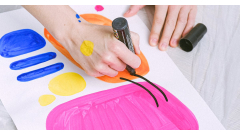
Discover the power of Prismacolor Colorless Blender Pencils, available in a convenient 12-pack designed for adult coloring enthusiasts. These exceptional pencils allow you to blend your colors flawlessly, creating smooth transitions and enhancing the overall vibrancy of your artwork. Ideal for experienced artists and beginners alike, the colorless blender pencils serve as an essential tool to elevate any color palette, allowing for creativity without limits. With a reputation showcased over years of quality, these pencils are the perfect addition to your coloring arsenal.
Choosing Your Color Palette
Selecting a cohesive color palette is crucial in creating artwork that resonates with viewers. When working with Prismacolor Colorless Blender Pencils, artists can significantly enhance their color selections, ultimately elevating their projects. A well-chosen color palette can evoke emotions and set the mood for the artwork. Think about the themes or subjects you want to portray—this will guide your selection process. For instance, a soothing landscape might benefit from a palette of soft greens and blues, while a vibrant floral piece could utilize bold reds and yellows.
To achieve harmony in your artwork, consider using complementary, analogous, or monochromatic color schemes. Complementary colors, such as blue and orange, create a striking contrast that makes your artwork pop. Analogous colors, like greens, yellows, and oranges, produce a serene and cohesive look. Monochromatic schemes, which use varying shades of a single color, can convey depth and sophistication. Here are some vivid examples of color combinations that work beautifully together:
- Soft pastels for a delicate touch: Lavender, pale pinks, and light blues.
- Earthy tones for a natural vibe: Olive green, burnt sienna, and warm beige.
- Bright and bold for energetic pieces: Crimson, turquoise, and sunny yellow.
Understanding Color Blending
Blending colors effectively requires a solid grasp of how colors interact when layered. When using traditional coloring mediums, like markers or watercolors, colors can blend directly on the paper or canvas, creating new hues and tints. However, Prismacolor Colorless Blender Pencils allow you to achieve a smoother gradient and a more refined blend by using a wax-based pencil to manipulate the colored layers without adding pigment. The beauty of these blenders lies in their ability to soften edges and unify colors seamlessly while maintaining the vibrancy of the original shades.
Familiarity with essential color theory concepts can significantly enhance your blending techniques. Understanding primary, secondary, and tertiary colors will guide your color choices and layering strategies. Utilizing complementary colors can produce striking contrasts, while analogous colors create harmony. Incorporating techniques such as layering, feathering, or circular motions while applying your Prismacolor Colorless Blender will give your artwork depth and dimension. Experimenting with pressure can also yield different effects; light pressure can blend gently, while firmer pressure can create bolder, more saturated results.
- Recognize how layering affects the final outcome.
- Appreciate the smooth finish of blending with a colorless pencil.
- Apply knowledge of color theory to enhance artistic expression.
Layering Techniques
Using Prismacolor Colorless Blender Pencils effectively requires an understanding of how to layer colors to achieve depth and dimension in your artwork. Start by selecting your primary colored pencils and lightly apply your first layer of color to the area you wish to work on. It’s essential to use light pressure during this initial stage, allowing the pigment to lay down smoothly without overwhelming the paper. Gradually build up the pigment by adding additional layers of color; this process respects the paper’s texture and creates a more nuanced look.
After achieving the desired base colors, utilize the Prismacolor Colorless Blender Pencil to blend the layers seamlessly. Apply the blender pencil with moderate pressure to merge the colors together, enhancing the depth of your artwork. Remember that varying your pressure will yield different results: lighter pressure will lead to a softer blend, while heavier pressure can intensify the color saturation. When blending, always work in circular motions or back and forth strokes to evenly distribute the pigment across the area. This technique not only softens the edges between colors but also creates a more polished finish.
- Experiment with different combinations of colors in the layering process for unique effects.
- Apply the blender pencil not just to blend, but also to lighten areas by resting it on the paper before applying any color directly.
- Consider using multiple layers of the colorless blender itself to build up a smooth, glossy texture.
Using Blender Pencils Correctly
Utilizing Prismacolor Colorless Blender Pencils effectively can transform your artwork, enhancing color depth and ensuring seamless transitions between shades. When using these specialty pencils, start by layering your colored pencils as you normally would. Once you are satisfied with your base colors, take your colorless blender pencil and gently work it over the colored areas. The pressure applied is crucial; too much pressure can cause the underlying colors to smudge or dull. Aim for a light touch, allowing the wax or oil in the blender pencil to meld the colors without overpowering them.
Technique plays a significant role in achieving a polished finish with your Prismacolor Colorless Blender Pencils. Use a circular motion or back-and-forth strokes with the blender pencil to distribute the color evenly. This technique helps eliminate harsh lines and creates a soft gradient effect. To maintain the best blending quality, regularly sharpen your blender pencil using a pencil sharpener designed for colored pencils. A finely pointed tip allows for precise blending in tight spaces. Keeping a fine tip also reduces the risk of damaging your colored pencil layers beneath. For optimal results, always ensure the tip of the pencil is clean before blending.
- Apply light pressure for smoother blends.
- Use circular motions for better color integration.
- Sharpen the pencil regularly for precision.
- Keep the blender pencil tip clean to avoid color contamination.
Achieving Gradient Effects
Creating stunning gradient effects in your artwork can elevate your coloring projects to new heights, and using Prismacolor Colorless Blender Pencils is an excellent way to achieve those smooth transitions. These special pencils allow you to blend different colors seamlessly, making it easier than ever to incorporate gradients. Begin by selecting your color palette for the piece you are working on. For optimum results, choose a variety of colors that complement each other. A typical gradient may involve two to four colors that transition from a lighter hue to a darker one.
Start with the lighter end of your chosen color range. Apply your first color to the area of your artwork where you want the gradient to start, using light, even pressure. Proceed to apply the next color, but make sure to overlap the edges where the two colors meet slightly. This initial blend will create a foundation for the gradient. Take your Prismacolor Colorless Blender Pencil and gently go over the transition area where the colors overlap, using a circular motion or light strokes to blend them together. Repeat this process as you introduce each additional color; always focus on creating a smooth transition. Tips for ensuring a seamless gradient include:
- Use light pressure with your blender pencil to avoid damaging your paper.
- Work with clean pencils; sharpen them regularly for the best results.
- Experiment with layering; sometimes more than one pass with the blender pencil enhances the blend.
- Maintain a consistent angle and direction when applying colors to avoid harsh lines.
Examples of gradients can be seen through artistic works that combine colors like teal to blue or pink to lavender. By adapting your techniques towards your desired outcome, you can create unique, beautiful artwork enriched with dreamy, gradient effects.
- Always keep a scrap piece of paper nearby for testing your blending technique before applying it to your artwork.
- Consider using Prismacolor’s wax-based colored pencils to ensure compatibility with the blender pencil.
Fixing Mistakes
Coloring with Prismacolor Colorless Blender Pencils can lead to beautiful and vibrant artwork, but sometimes mistakes happen. Whether it’s an overly harsh line or colors that have become muddied, there are effective techniques to rectify these issues. One method for lifting color involves using a clean, dry blender pencil. Gently go over the area where the mistake occurred, applying light pressure. This can help to pull up some of the pigment, allowing for a more seamless blend or correction. If the color is still too intense, you might want to try using a kneaded eraser to gently dab the spot, absorbing some of the color without damaging the paper.
For areas that appear muddied, blending over them with a lighter shade can work wonders. Utilizing the Colorless Blender Pencil specifically allows you to soften harsh lines or uneven color application. Start by lightly layering the blender pencil over the affected area, using small circular motions to encourage better integration of colors. Patience is key here; don’t rush the process. It may take several passes to achieve the desired effect. Experimentation can also help; try out different angles and pressures to see how your color might shift and change with each stroke.
- Use a clean, dry blender pencil to lift excess color.
- Apply light pressure to avoid damaging the paper.
- Utilize a kneaded eraser for deeper corrections.
- Blend with a lighter shade to fix muddied areas.
- Employ small circular motions for better blending.
- Allow yourself time and don’t hesitate to experiment with techniques.
Experimenting with Techniques
Utilizing Prismacolor Colorless Blender Pencils can dramatically enhance your coloring experience. These pencils, specifically designed for adult coloring, provide a unique way to create seamless blends and vibrant mixes of colors. One effective technique to consider is using circular motions with your blender pencil. This method helps to gently blend colors together, achieving a smooth transition that feels natural and pleasing to the eye. Carefully layering your colored pencils first, followed by the circular blending action, can yield astonishing results.
Another approach worth exploring is the side-to-side stroke technique. This movement can be particularly effective when working in larger areas or on detailed sections that require precision. By applying steady pressure and moving horizontally or vertically across your colored area, you can effectively merge colors and soften harsh lines. Dabbing, a method that involves lightly tapping the blender pencil to blend colors, also offers a unique texture and depth. Remember, experimentation is key. Keep practicing these techniques to discover which blends resonate with your artistic style and preferences.
- Try layering multiple colors before blending to see how they interact.
- Vary your pressure to achieve different effects from your blender pencil.
- Mix techniques to find your signature style in blending.
Related Products


Incorporating Mixed Media
Transforming your artwork by combining Prismacolor Colorless Blender Pencils with various media opens up a world of vibrant possibilities. Begin by layering your colored pencils, such as the rich hues of Prismacolor's 12 pack, as your base. Choose a design or image to work on, and lay down an initial layer of colored pencil. Select your colors thoughtfully to create depth and dimension, building up lighter and darker areas based on your vision. Once you're satisfied with your colored pencil layer, consider introducing watercolors or ink to expand your palette.
When working with watercolors, it’s essential to allow the pencil base to dry completely before adding any wet media, as this prevents the colored pencils from smudging. Use watercolors to create washes that can serve as backgrounds or enhance certain sections of your artwork. After applying the wash, allow it to dry, then revisit your colored pencil details, using the colorless blender pencil to merge the colors from the pencil and the watercolor smoothly. This will yield a seamless transition between the mediums, enriching the overall appearance of your piece. To further unify the colors, apply the blender pencil over both the colored pencil and the wet areas. For ink, use fine liners or brush pens strategically to add defined outlines or intricate details over your colored pencil groundwork, ensuring any ink applied should be dry before blending with the colorless pencil.
- Layer colored pencils for depth.
- Let watercolors dry before blending.
- Use the colorless blender for smooth transitions.
- Add ink details after colored pencil layers.
- Experiment with different techniques for unique textures.
Creating Texture
Utilizing Prismacolor Colorless Blender Pencils can significantly elevate the texture of your coloring projects, offering a smooth transition between colors and enhancing the richness of your artwork. When working on different surfaces or elements in your drawings, such as fur, foliage, or fabric, the versatility of these blending tools becomes apparent. Start by applying a base layer of colored pencil on your chosen surface. For example, when drawing fur, use short, quick strokes in the direction of the hair growth with a variety of colors to create depth. Then, follow with your colorless blender pencil over the layered colors. This technique will soften the edges and allow the hues to meld seamlessly, mimicking the natural look of fur more effectively.
Similarly, for foliage, lay down darker greens in the shadowed areas and lighter greens or yellows where light hits. Gently blend using the colorless blender to produce a sense of dimension and realism in your leaves. The unique wax-based formulation of Prismacolor's product prevents the paper from becoming too saturated and allows the colors to retain their vibrancy, even after blending. When it comes to fabric textures, try layering several colors to mimic the folds and shadows found in drapery, and then utilize the blender pencil in circular motions to soften the lines and create realistic highlights. Experimenting with these techniques will help you to discover how effective the Prismacolor Colorless Blender Pencils are at adding texture to your adult coloring projects.
- Use short, directional strokes for fur.
- Apply darker colors first for foliage before blending lighter colors on top.
- Experiment with circular motions for fabric textures.
- Always maintain the paper's texture to retain vibrancy.
Care and Maintenance
Maintaining your Prismacolor Colorless Blender Pencils is essential for ensuring their longevity and optimal performance. One critical aspect is sharpening. Utilizing a quality pencil sharpener designed for colored pencils helps achieve a fine point without damaging the wood casing or the softer lead. Avoid excessive pressure while sharpening as this can break the core and impact the blending capabilities. Manual sharpeners generally work well; however, electric sharpeners can be used with caution to prevent over-sharpening. It’s recommended to periodically check the sharpened points and adjust accordingly for the best results in your coloring projects.
Proper storage plays a significant role in the upkeep of your blender pencils. Store the 12-pack of Prismacolor Blender Pencils in a pencil case or a dedicated compartment to prevent them from rolling around and breaking. Keeping them upright can also help to preserve the tips. Always avoid exposing the pencils to extreme temperatures or direct sunlight, as this can warp the wood and affect the integrity of the lead. Frequent replacement is not always necessary; however, if you notice that the pencils are not blending as smoothly or that the tips are breaking easily, it may be time to invest in a new set. Keeping your supplies organized can enhance your creative flow.
- Use a sharp pencil sharpener specifically suited for colored pencils
- Avoid applying excessive pressure while sharpening
- Store pencils in a protective case or compartment
- Avoid exposure to extreme temperatures and sunlight
- Replace pencils when they show signs of wear or reduced performance
- Maintain an organized workspace for efficient use
Why We Chose This Product
In choosing Prismacolor Colorless Blender Pencils for this guide, I aimed to showcase a product that truly uplifts the coloring experience. These pencils are not just blending tools; they are essential components for any artist looking to refine their craft. Ensuring that each layer and shade harmonizes beautifully is a vital aspect of creating stunning artwork, and these blender pencils facilitate this like no other.
- Enhances color vibrancy and depth
- Simplifies the blending process
- Compatible with a wide range of mediums
- Easy to use for artists at all skill levels
Prismacolor’s commitment to quality and innovation makes them a trusted choice among artists. By mastering their use, you empower yourself to create art that captivates and inspires, and that’s what truly makes this guide valuable.
Discover the power of Prismacolor Colorless Blender Pencils, available in a convenient 12-pack designed for adult coloring enthusiasts. These exceptional pencils allow you to blend your colors flawlessly, creating smooth transitions and enhancing the overall vibrancy of your artwork. Ideal for experienced artists and beginners alike, the colorless blender pencils serve as an essential tool to elevate any color palette, allowing for creativity without limits. With a reputation showcased over years of quality, these pencils are the perfect addition to your coloring arsenal.