Welcome to your journey of artistic expression with the Prismacolor Colorless Blender Pencils! These little wonders will transform your coloring experience by allowing you to create stunning textures and shading effects that breathe life into your artwork. As we dive into this guide, get ready to unlock the full potential of your coloring projects, turning simple sketches into breathtaking masterpieces.
The Prismacolor Colorless Blender Pencils are designed for artists of all levels looking to enhance their coloring techniques. Their ability to blend colors and add depth is unmatched, making them a must-have for any coloring enthusiast. In this guide, we’ll explore a series of innovative methods to utilize these pencils creatively, ensuring your art stands out from the crowd!

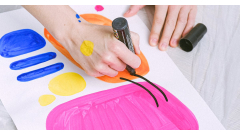
The Prismacolor Colorless Blender Pencils pack offers a premium experience for adult coloring enthusiasts. This 12-pack is designed not just to color, but to enhance and transform your art through blending and shading. With its smooth application, you can achieve dynamic effects that bring depth and life to your illustrations. The colorless aspect allows for seamless integration with other colors, providing flexibility and creativity at your fingertips. Whether you're a hobbyist or a seasoned artist, these blender pencils will elevate your artwork to a professional level!
Basic Techniques
The Prismacolor Colorless Blender Pencils are essential tools for achieving smooth blends and enhancing your coloring projects in adult coloring books. These pencils help you manipulate colored pencil applications on various mediums, allowing for unique textures and effects. Utilizing the colorless blender effectively calls for mastering several fundamental techniques that will elevate your artistic creations.
Begin by preparing your colored pencil base. Choose a medium such as smooth cardstock or a thick drawing paper for optimal blending. Apply the colored pencils using different motions: circular strokes create softer transitions, back-and-forth movements can fill larger areas efficiently, and gentle soft strokes allow for lighter touches that delicately layer colors. Pay attention to the pressure you apply; light pressure results in subtle blending, while heavier pressure creates more coverage and pronounced blending effects.
- Establish a base layer using colored pencils.
- Experiment with circular motions to achieve soft gradients.
- Utilize back-and-forth strokes for even coverage in larger areas.
- Apply soft strokes for gentle blending, building layers gradually.
- Adjust pressure: lighter for subtle effects, heavier for bold blends.
Layering Colors
Creating unique textures with Prismacolor Colorless Blender Pencils involves a careful layering of various colored pencils before blending them seamlessly. Start by selecting a palette of colors that complement each other. For instance, using warm colors like reds and oranges alongside cooler shades like blues and greens can create dynamic contrasts that add depth. When applying the colored pencils, begin with the lightest shade first; this sets a foundation, allowing the darker colors to sit on top without overpowering the lighter tones. Gradually build up the layers, increasing pressure as you apply darker hues while maintaining a smooth application to avoid gaps in color.
Another tip revolves around your application technique. Instead of coloring in broad strokes, try using small, circular motions to fill in the area; this can help in achieving a smoother transition between colors. Once you have your layers established, take the Prismacolor Colorless Blender Pencil and apply it over the colored areas using a light, even pressure. This specific blender pencil is effective due to its ability to mix and melt the colors together without altering their hue. To achieve varied textures, experiment by applying more pressure in some areas and less in others, allowing the different layers to peek through. Additionally, consider layering in unique patterns, such as cross-hatching or stippling, to create intricate designs before blending. Helpful tips include:
- Choose a cohesive color palette that balances warm and cool tones.
- Start with light colors and build up to darker shades for optimal blending.
- Use small, circular motions to ensure smoother color application.
- Experiment with pressure to achieve different textures while blending.
Creating Smooth Gradients
Creating smooth gradients with Prismacolor Colorless Blender Pencils can elevate your coloring projects to the next level, allowing for captivating transitions between colors. To begin, choose a color palette that complements each other, ensuring that the colors can blend harmoniously. Start by coloring the base layer of your chosen hues on the paper, applying the first color lightly. This technique allows you to create a foundation that can be easily blended. Remember, the pressure applied should be gentle initially to prevent overpowering the paper's texture.
Once you've laid down your base layers, select the Prismacolor Colorless Blender Pencil. This pencil acts as a bridge between colors, providing seamless transitions. To achieve smooth gradients:
- Start from the lighter color and progressively move toward the darker shade.
- Use gentle circular motions with the blender pencil over the area where colors meet. This technique softens the edges effectively.
- Don’t use too much pressure; this can lead to muddy results. Light pressure allows the wax of the colored pencils to melt into one another more gradually.
- If you find there is not enough blend, lightly layer additional color before using the blender pencil again.
Always ensure that your blender pencil tip is clean and free from debris, as this will provide the best blending results. Lightly clean it with a tissue if you notice accumulated color. Experiment with different coverage areas and blending patterns to see what works best for your artwork.
- It may take some practice to master the right pressure and technique.
- Work in small sections to maintain control over the gradient.
- Be patient and allow colors to settle before adding additional layers.
Texture Effects
Creating unique texture effects with Prismacolor Colorless Blender Pencils can elevate your adult coloring projects to a new level. These pencils are specifically designed for blending colors and creating various textures through effective manipulation of pencil pressure. Achieving smooth, glossy, or matte surfaces is key to enhancing the depth and volume of your artwork.
To create a smooth texture, gently blend your colored pencils using the colorless blender pencil. Light, consistent pressure will allow the colors to merge seamlessly. Practice layering multiple colors before blending to achieve soft transitions between tones. For a glossy effect, apply a heavier pressure with the colorless blender pencil over a well-layered base. This will push the pigment particles closer together, resulting in a shiny finish. Lastly, for a matte surface, use a lighter area of your colored area and apply less pressure with the blender pencil. This technique reduces the shine and keeps the texture soft and muted.
- Experiment with different colors; dark colors blended with light can create depth.
- Try blending in circular motions to see how it affects the texture.
- Keep your blender pencil sharp for finer details and precision.
- Mix colored pencils to create your own unique shades before blending.
Fixing Mistakes
Using Prismacolor Colorless Blender Pencils can elevate your adult coloring projects, but mistakes can occur. When you find yourself with marks or coloration that detracts from your desired effect, there are efficient techniques to correct them. Start by using a clean, sharp eraser to carefully lift any excess color from the paper. Gently dab the eraser on the area where the mistake lies, taking care not to tear the paper. If the color still remains, consider using a cotton swab dipped in a small amount of colorless solvent, like mineral spirits. Lightly dab the swab on the error, blending the unwanted color back into the surrounding areas. This method effectively removes the excess hue while maintaining the integrity of the surrounding coloring.
Another effective method to fix mistakes is to blend over unwanted marks with your Prismacolor Colorless Blender Pencil. Applying light pressure, work in circular motions over the unwanted marks. This process not only helps to soften the lines but also blends the surrounding colors for a smoother appearance. If necessary, build up the layers gradually to maintain control over your application. Prevention is also key to avoiding mistakes: use lighter strokes initially and gradually increase pressure as you build color. Whether you're working with fine details or large areas, keeping your strokes light can help minimize the chance of errors from the offset. To help guide your practice further:
- Keep a small sample paper handy to test blending techniques.
- Position your hands carefully to avoid smudging already colored areas.
- Regularly sharpen your blender pencils to maintain precision and control.
- Consider a light sketch of your coloring plan before applying color.
Experimenting with Surfaces
When using Prismacolor Colorless Blender Pencils to create unique textures, don’t just stick to standard coloring paper. Think outside the box and explore a variety of surfaces that can bring your artwork to life. Textured papers, canvases, and even wood can transform your coloring experience and offer exciting new challenges. Each surface comes with its own characteristics, which can influence how the blender pencil interacts with the colored mediums applied. For textured papers, you’ll discover that the variances in the surface can create depth and dimension. Begin by experimenting with heavy-weight watercolor paper or linen-textured cardstock, focusing on gentle pressure to allow the colors to settle into the crevices. Adjust your application technique by alternating between layering color and then using the blender pencil to smooth transitions and blend edges. You will find that the texture will hold onto pigments differently, which adds to the intrigue of your finished piece.
Canvases can also be an extraordinary alternative to traditional paper. Their coarse surface allows for bolder strokes and encourages the mixing of colors directly on the substrate. With Prismacolor's Colorless Blender Pencils, the capability to blend colors on these surfaces enhances vibrancy and richness. Try to create an underpainting using oil or acrylic paints, then utilize the blender pencil to add layers of color on top. When working on wood, prepare the surface by applying a primer or gesso to ensure the color adheres properly. The natural grain of the wood not only adds texture but also highlights the blending process beautifully. Engage with the direction of the grain, using it to influence the flow and design of your artwork. For any of these surfaces, consider the following tips:
- Test your color combinations on a small piece of the same material before going large.
- Vary the pressure applied to the blender pencil; heavier pressure will yield different results than light pressure.
- Allow layers to dry completely when working with mixed media on canvases or wood.
Combining with Other Media
Integrating Prismacolor Colorless Blender Pencils with other artistic mediums can elevate your adult coloring projects and introduce unique textures and effects. These pencils are particularly effective when used alongside markers, inks, or watercolors. Begin by selecting your primary medium. For example, if you choose alcohol-based markers, apply them first to create vibrant color layers. After allowing the ink to dry for a few minutes, take your colorless blender pencil and gently shade over the areas you've colored. The blender pencil will help to soften the edges and merge the colors seamlessly, creating a smooth gradient. Remember that the drying time for markers is crucial; waiting at least five minutes helps prevent any smudging as you blend.
When working with watercolors, the process differs slightly. Begin by painting your desired background with watercolor paints, allowing it to dry completely. The gentle nature of watercolors lends well to the blender pencil, as it can soften dry edges and add dimension to your design. Apply the colorless blender in circular motions over the painted areas to unify the colors. This method results in a soft finish that enhances the overall quality of your artwork. For both mediums, you can layer the colorless pencil in between color applications to enhance depth and texture. A few additional tips include:
- Always experiment on a scrap piece of paper before applying techniques directly to your artwork.
- Consider using lighter color layers as your base; darker colors can be blended with the colorless pencil for dramatic effects.
- Keep your blender pencil sharpened for precision and best results.
Related Products


Advanced Blending Techniques
For artists seeking to achieve stunning depth and realism in their adult coloring projects, advanced blending techniques using Prismacolor Colorless Blender Pencils can elevate your work to new levels. One of the most effective methods is cross-hatching, a technique that involves layering lines in different directions to build texture and dimension. Begin by applying your primary colors in light, even strokes. Once the base layer is set, employ the colorless blender pencil to gently blend the layers, seamlessly integrating the colors while adding a unique texture to the artwork.
Another essential technique is stippling, which consists of creating an image through a series of dots. This method is particularly effective for achieving shadows and varying tones. After applying sections of color, use the Prismacolor Colorless Blender Pencil to soften the edges of the dots, allowing them to merge subtly into the surrounding hues. Consider these tips for successful blending:
- Start with a light touch; control the pressure to avoid overwhelming the base colors.
- Experiment with different colors and layering sequences to find what works best for your artwork.
- Maintain the integrity of the paper by gently sanding the pencil point for a finer tip, allowing for more precision in blending.
Using Reference Images
Utilizing reference images is crucial for creating realistic textures when working with Prismacolor Colorless Blender Pencils, especially in the realm of adult coloring. These tools enhance vibrant colors and help in smoothly transitioning between shades, but the foundation of any lifelike artwork begins with a solid understanding of the elements you wish to replicate. Reference images serve as guides that inform your choices regarding color, texture, and light, providing a visual benchmark that improves the accuracy of your blending techniques.
When selecting reference images, consider the following criteria to ensure they will contribute effectively to your art:
- Quality: Choose high-resolution images. The details in textures and shadows will be clearer.
- Lighting: Look for images with strong light and shadow contrasts, as they will help you understand depth and dimension.
- Color: Select references that feature a color palette close to what you wish to create, allowing for more cohesive blending.
- Texture: The more varied the textures in your reference image, the more practice you will have in replicating different surfaces.
Once you have selected your reference images, analyzing them is essential. Observe how light interacts with surfaces by noting where highlights and shadows fall. Focus on the minutiae:
- Understand the direction of light: This will guide your shadow placement and blend techniques.
- Examine the color transitions: Observe how colors blend and shift in areas of light and dark.
- Replication techniques: With a keen eye, use your Prismacolor Colorless Blender Pencils to smooth out transitions and create gradients that mimic those in your reference.
Maintaining Your Tools
To keep your Prismacolor Colorless Blender Pencils in optimal condition and enhance their blending capabilities, regular maintenance is essential. These pencils, designed for adult coloring, require a specific approach to ensure longevity and high performance. Start with sharpening: utilize a quality pencil sharpener that accommodates the size of the blender pencils. Choose a sharpener with a smooth, clean cutting mechanism to prevent breaking the leads. For a manual touch, consider using a craft knife or sandpaper to shape the tip gently—this helps control the sharpness and preserves the integrity of the pencil. When sharpening, do so gradually to avoid applying too much pressure, which can lead to unwanted chipping.
Proper storage is also crucial in maintaining your pencils. Keep the Prismacolor Colorless Blender Pencils in a sturdy case or a designated pencil holder away from extreme temperatures. Ensure the tips are well protected to avoid accidental breakage. Additionally, consider grouping the pencils by color or type to maintain organization. Avoid leaving them exposed, as environmental factors can wear them down faster. Check for signs of wear regularly; if your pencils show any damage, replace them to maintain quality in your artwork.
- Use a high-quality sharpener for a clean edge.
- Sharpen gradually to prevent lead damage.
- Store pencils in a protective case or holder.
- Keep them away from extreme temperatures.
- Organize by color or type for easy access.
Why We Chose This Product
As we wrap up our exploration of the Prismacolor Colorless Blender Pencils, it’s clear why they are an exceptional choice for this guide. Their versatility and ability to blend seamlessly allow artists to experiment with unique textures, elevating their work to new heights. Choosing this product was a deliberate decision to inspire creativity and provide you with tools that are truly transformative in your coloring journey.
- Versatile blending capabilities for various mediums
- Easy to use, making them suitable for beginners and advanced artists
- Durable and long-lasting, ensuring consistent performance
With these pencils in your toolkit, you can explore an endless array of techniques, allowing your imagination and creativity to flourish. Now is the time to grab your Prismacolor Colorless Blender Pencils and start crafting your unique artistic textures!
The Prismacolor Colorless Blender Pencils pack offers a premium experience for adult coloring enthusiasts. This 12-pack is designed not just to color, but to enhance and transform your art through blending and shading. With its smooth application, you can achieve dynamic effects that bring depth and life to your illustrations. The colorless aspect allows for seamless integration with other colors, providing flexibility and creativity at your fingertips. Whether you're a hobbyist or a seasoned artist, these blender pencils will elevate your artwork to a professional level!